Ensuring your Jitsi Meet platform has up-to-date SSL certificates is crucial for security and trust. However, in Kubernetes deployments, this task is not as straightforward as on a conventional server. This guide provides a step-by-step walkthrough on how to generate and deploy new certificates for your Jitsi Meet and TURN server domains using Certbot and `kubectl`.
Before You Begin
Schedule Downtime
Section 1: Preparing the Environment
First, you'll need a temporary cloud server with public internet access to generate the certificates.
Step 1.1: Log into Your Server
Connect to your cloud server via SSH. All subsequent commands will be run from this server.
Step 1.2: Set Up Certbot
Install Certbot and the `acme-dns-auth` script, which will help automate the DNS challenge for certificate issuance.
sudo apt update
sudo apt install snapd
sudo snap install core; sudo snap refresh core
sudo apt remove certbot
sudo snap install --classic certbot
sudo ln -s /snap/bin/certbot /usr/bin/certbotwget https://github.com/joohoi/acme-dns-certbot-joohoi/raw/master/acme-dns-auth.py
chmod +x acme-dns-auth.py
sed -i 's|#!/usr/bin/env python|#!/usr/bin/env python3|' acme-dns-auth.py
sudo mkdir /etc/letsencrypt
sudo mv acme-dns-auth.py /etc/letsencrypt/Section 2: Obtaining the SSL Certificates
Next, we will generate the certificates for both your Jitsi Meet and TURN domains separately.
Step 2.1: Generate Certificate for Jitsi Meet Domain
- Run the Certbot command for your Jitsi domain (`my.domain.com`).
- Follow the prompts: Add your email address when prompted to continue.
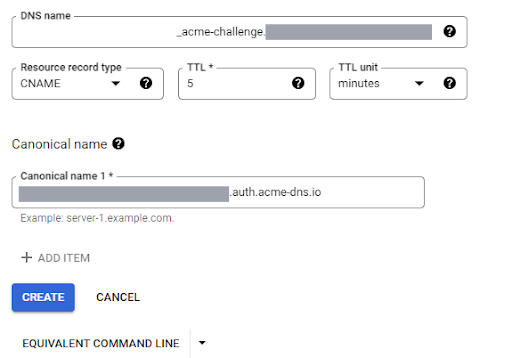
- Create a CNAME record: Certbot will ask you to add a specific CNAME record to your domain's DNS zone. Log into your DNS provider (e.g., Google Cloud DNS) and add this record.
- Continue and verify: Press Enter in the terminal to allow Certbot to verify the DNS record.
- Locate your certificate: Once successful, your certificate and private key will be saved.
- Certificate: `/etc/letsencrypt/live/my.domain.com/fullchain.pem`
- Key: `/etc/letsencrypt/live/my.domain.com/privkey.pem`
sudo certbot certonly --manual --manual-auth-hook /etc/letsencrypt/acme-dns-auth.py --preferred-challenges dns --debug-challenges -d my.domain.com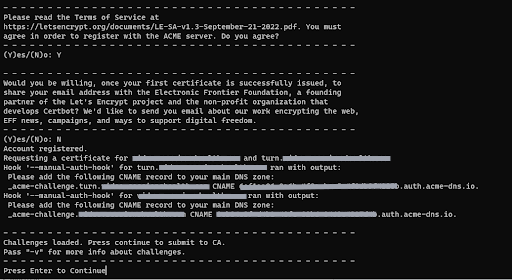
Step 2.2: Generate Certificate for TURN Server Domain
- Run the Certbot command for your TURN domain (`turn.my.domain.com`).
- Follow the same process: Add the new CNAME record to your DNS zone as prompted.
- Locate your certificate: Your new certificate and key will be saved.
- Certificate: `/etc/letsencrypt/live/turn.my.domain.com/fullchain.pem`
- Key: `/etc/letsencrypt/live/turn.my.domain.com/privkey.pem`
sudo certbot certonly --manual --manual-auth-hook /etc/letsencrypt/acme-dns-auth.py --preferred-challenges dns --debug-challenges -d turn.my.domain.comSection 3: Deploying the Certificates to Kubernetes
With the new certificates generated, you can now deploy them to your Kubernetes cluster.
Step 3.1: Update ConfigMaps
- Save certificates locally: Copy the contents of the `fullchain.pem` and `privkey.pem` files for both domains to your local machine.
- Connect to your cluster: Ensure `kubectl` is installed and configured to connect to your Kubernetes cluster.
- Update HAProxy/Meet ConfigMap: Modify the YAML file for your HAProxy or Jitsi Meet ConfigMap, replacing the old certificate and key for `my.domain.com` with the new ones.
- Update TURN ConfigMap: Similarly, update the TURN ConfigMap YAML with the new certificate and key for `turn.my.domain.com`.
Step 3.2: Apply Changes and Restart Deployments
- Apply the new configurations to your cluster.
- Restart the deployments to ensure they pick up the new certificates.
# First, set your kubectl context
kubectl config use-context <your-context-name>

# Apply the updated ConfigMap files
kubectl apply -f <haproxy-configmap-yaml-filename>
kubectl apply -f <turn-configmap-yaml-filename># Get the names of your deployments
kubectl get deployments
# Restart the relevant deployments
kubectl rollout restart deployment <haproxy-deployment-name>
kubectl rollout restart deployment <turn-deployment-name>Section 4: Final Cleanup
After confirming that your services are running correctly with the new certificates, you can perform the final cleanup steps.
- Remove DNS Records: Delete the temporary CNAME records you added to your DNS zone for Certbot verification.
- Decommission Server: You can now safely stop or terminate the cloud server instance you used to generate the certificates.
Frequently Asked Questions
Why do I need a separate server to generate certificates?
Using a separate, temporary server for Certbot simplifies the process by providing a clean environment with public internet access, which is necessary for the DNS challenge, without altering your core Kubernetes infrastructure.
What happens if I don't update my SSL certificates?
Expired SSL certificates will cause browsers to show security warnings to your users, and many clients or services may refuse to connect altogether, leading to service outages.
Can I automate this process?
Yes, this process can be automated using Kubernetes operators like `cert-manager`, which handles the entire lifecycle of SSL certificates automatically. This guide covers the manual process, which is useful for understanding the underlying steps.
Need Help with Your Jitsi Deployment?
Managing Kubernetes and Jitsi can be complex. If you need assistance with your deployment, security, or automation, our team of experts is here to help.
Get Expert Support